How to personalize your Zazzle purchase

Create personal gifts like a pro
Zazzle has an amazing selection of artwork and designs that can be custom printed on T-shirts, phone cases, clocks, mugs, business cards, wedding invitations and a whole lot more. You can order them just as you see them, or you can add your own personal touch by adding photos or text.
Welcome to the age of mass customization!
Sure that all sounds good - but exactly how do you customize products? It's really pretty easy once you know the ropes. If you got a few minutes, I'll show you what to do - including how to add a drop shadow to your text for a truly professional look.
(Zazzle products screenshot - Image By Author)
Personalized gifts and keepsakes
Get creative for that special someone
It's never been easier to add a personal touch to cards, invitations, gifts and family keepsakes.
Zazzle has a large selection of printable items for your office, home, pets, and electronics. When you find that perfect mug for your boss or an ornament for that special occasion, you can easily add their name, a funny caption or that memorable date. Those are just a few ideas to get you thinking.
You can also upload your own photos if you wish. It's easy to do with just a couple of mouse clicks.
Most products in the Zazzle marketplace are customizable, however, some artists choose to sell their zazzle designs exactly as shown and disable the customization option.
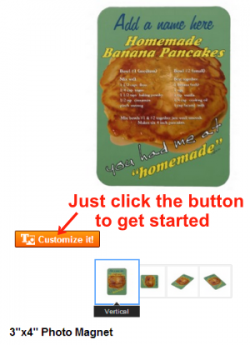
If you're browsing for a Zazzle item that you can personalize as a gift, look for the orange "Customize it!" button below the product image - just click on it and you have the com!
(Image By Author)
Basic customizing tools - Editing tools layout
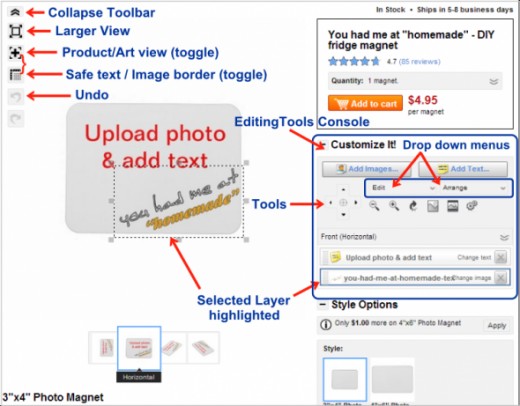
The image above (with my annotations in red and blue) shows what you'll see when you click on the orange Customize it! button. The editing tools console appears below the add to cart button on the right and the product display options appear on the left.
At the top of the console you'll see the Add Images button and Add Text button. I'll get to those a bit later.
Editing Console Tools:
Below those two buttons are a drop-down Edit menu, drop-down Arrange menu and a row of editing tools. The tools from left to right are:
- Move tools (joystick-type operation)
- Resize - / +
- Rotate clockwise (4 or 8 directions)
- Resize to fill available space (crops image)
- Resize to fill available space (no cropping)
Image Display Options:
You'll see a vertical row of icons just to the left of the product image. These allow you to change views for fine tuning details and previewing your work. These icons from top to bottom are:
- Collapse toolbar
- View larger
- Show/hide Art View
- Show/hide Borders or Gridlines
- Undo
- Redo
(Image By Author)
Image display area - Intuitive drag and drop editing
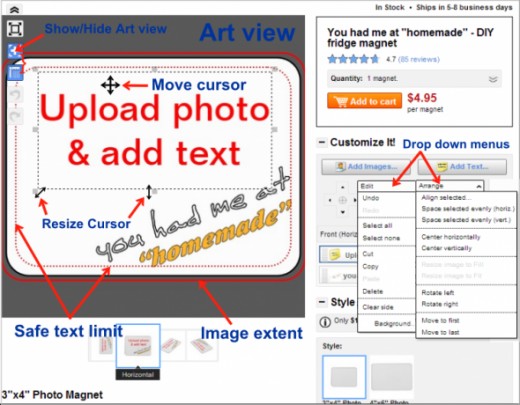
Have a look at the image above and you can see what you'll find in the drop-down Edit and Arrange menus in the Editing Console. The product image area on the left is where you see the results of of the changes you make using the editing tools. Select the art view (shown) for more precise editing.
You can drag and drop any selected image or text to resize or move it in this area as well. This is a lot faster and easier than the using the editing console tools for some things. You'll likely find using a combination of drag and drop and the editing tools console gets you where you want to go.
Drag and Drop Tip 1: Place the cursor over one of the resizing squares on the dotted border of selected text or an image and you'll see it change to a double-ended arrow indicating the direction of stretching. Use only the corner boxes to resize an image if you want to keep it in the proper proportions.
Drag and Drop Tip 2: Hold the cursor over any selected image or text and you'll see it change to a 4-way arrow - that tells you you can move the selected object by dragging it in any direction.
(Image By Author)
You had me at "homemade"
- DIY fridge magnet
Go ahead - click the magnet on the right and the Zazzle product page will open in another window - so you can return to this page for reference.
Don't worry, you can't break anything or mess anything up doing this - it will all be safely restored to exactly the way you found it as soon as you exit (or reload) the page.
The "you had me at "homemade" caption is actually an image and not editable text. Drag it around, resize it, rotate it - just mess around to see what happens.
You'll also notice when you click on "Upload photo and add text" - a new row of tools appears in the console. We'll look at those after we upload a photo.
How to upload a photo - Personalize it with a picture
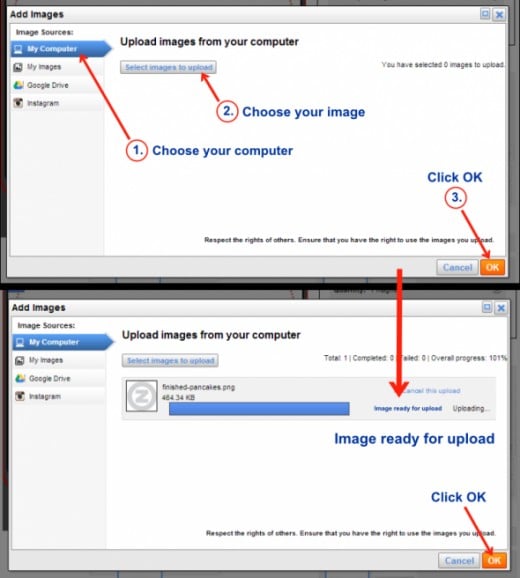
Uploading a photo is really easy. Click on the "Add Image" button and you'll see a dialogue box (top image above).
1. Select your computer (or wherever your picture is)
2. Find the photo on your hard drive
3. Click OK
A second dialogue box will appear showing an empty bar along with the name of your photo. Click OK and the file will begin uploading. When the upload is completed you'll see your image highlighted in the centre of the product display.
(Image By Author)
Image layers - You want the text on top
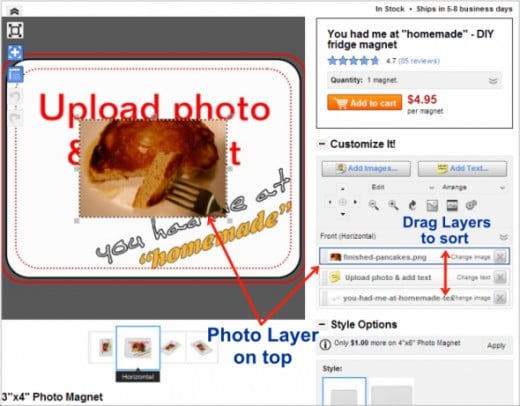
Take a look at the product image above and you'll notice the text is behind the photo that was added. If you look just below the edit console tools you'll see a column of boxes representing each image and text box. These are the layers that make up the composite image that gets printed.
If you've ever worked with photoshop or other image editing software you're familiar with layers. Whatever is at the top of the list is "in front" of the next item down, and so on. To move the photo to the background, just drag that box to the bottom of the column with your mouse.
You can resize the image using the tools console or by dragging the corners and moving it to where you want.
Resizing/Moving Tip: When using the edit console tools to move or resize text or images:
Hold down the Control key to move or resize in smaller increments
Hold down the Shift key to move or resize in larger increments
Hold down the Control key and select multiple layers to move or resize them all at the same time
(Image By Author)
The text tools - Lots of flexibility
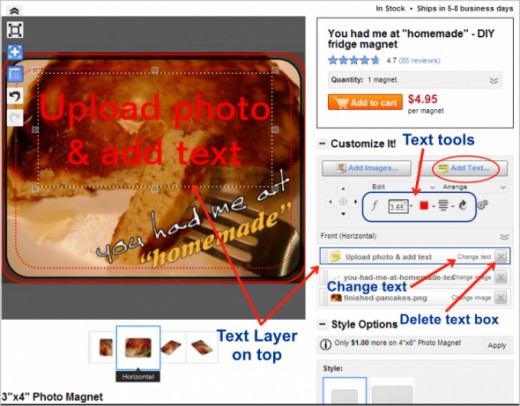
When you add or select text you'll see the resizing tools are replaced by some text tools. From left to right the text tools are:
Select Font (Tip: drag the dialogue box by top bar off to the side so you can see your text as you try different fonts)
Font size (type number or use up/down arrows on right)
Text color (click the colour box to open pallete)
Align Text (justify left, center, right)
Rotate Text (45 degree increments)
The text tools are really easy to use. To add new text just click the "Add Text" button and a dialogue box pops up. Just type what you want and click Done.
(Image By Author)
Customizing your text - Get professional-looking results
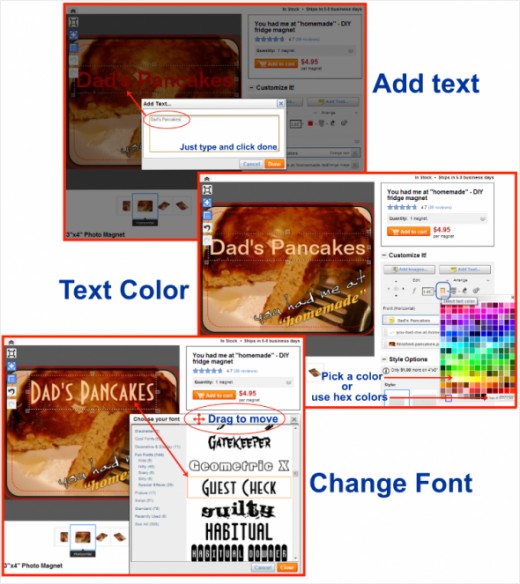
Hopefully by this point you've taken the opportunity to play around with at least some of the customization tools to see how easy it is.
The three screen images above show the basic steps to take to get your personal text typed in, choose a color that works for you, and select just the right font. You can always go back and change any of these aspects at any time. You can add as many text boxes as you want using different fonts, sizes and colors but it best to stick with one or two for the most professional look.
Custom text Tips:
If your text involves several lines, you might want to use a different text box for each line so you can arrange them closer together.
Copy your customized text style using copy and paste (under the edit drop-down menu)
NOTE: the paste command will place the copy exactly over the original so look for it in the layer column on the right, select it and move it so you can edit the copy. I'll address this in the next section.
(Image By Author)
Pro Text Tip
Next up: Learn how to add a drop shadow to make your text really stand out.
Creating a text drop shadow - Getting started
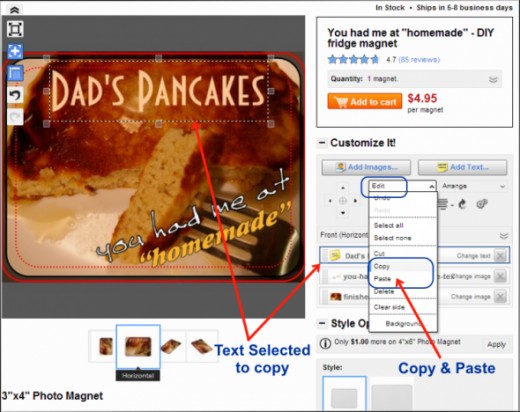
One thing you'll find frequently on professional text graphics is a drop shadow. A drop shadow helps lift the text off the background - especially when the text is over an image. You might not even be aware of it - but it's still doing it's job.
You can make custom drop shadows for your text with a just a few quick and easy moves. I'll run you through the steps and you can try it for yourself on any product in the Zazzle store.
Getting Started
You can see in the image above that the "Dad's pancakes" text is selected. We want to make a copy of that so click on the Edit menu and choose the Copy command (notice there is no paste command yet). The menu disappears after you click. Click on the Edit menu again and you see that the Paste option is now available. Choose the Paste command.
(Image By Author)
Creating a text drop shadow - Making the "shadow"
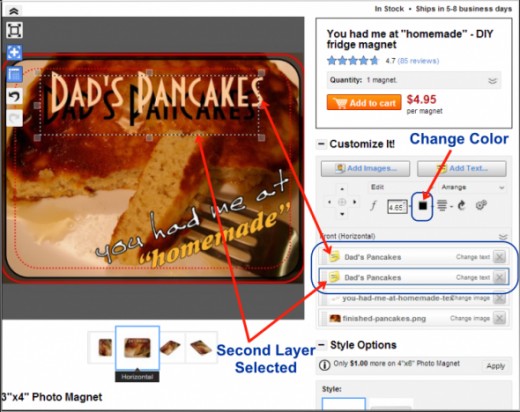
After choosing the paste command it may look like nothing happened - but it DID! The copy is positioned exactly above the original text. Look in the layers column and you'll see two boxes with the same text.
The second one down will be highlighted (your original), and the top layer will be the copy you made. In order to see the second layer, drag it or use the move tools to separate it from the copy.
Once you can see the second layer, change the color to whatever you want for a shadow - black, grey and white are neutral colors and work well for contrast against different backgrounds. Experiment and choose a shadow color that complements your text color and helps to separate the text from the background.
Just one more step and you're there.
(Image By Author)
Creating a text drop shadow - Setting the shadow offset
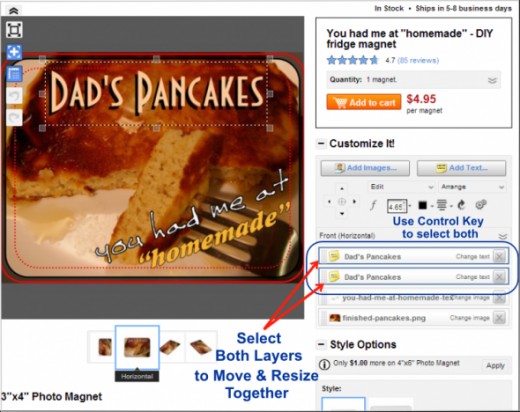
The shadow on your text can be any distance and any direction from your main text. Shadows in the real world are created by the sun or other light sources - usually shining down from above so recreating this effect looks most natural.
Experiment by using the move tools or dragging it around to find a pleasing location. Keep in mind, if the shadow is offset too far from the text it can become a bit hard to decipher. And text clarity is the main point of adding a shadow.
Once you have your text and shadow layers looking the way you want you can still move and resize them easily - both at the same time.
Hold down your Control key and select each layer in the layer column. Both boxes will have a blue border. As long as both are selected you can use any of the move or resize tools or drag and drop to fine-tune your personalized product.
(Image By Author)
See the big picture - The Zazzle large image viewer
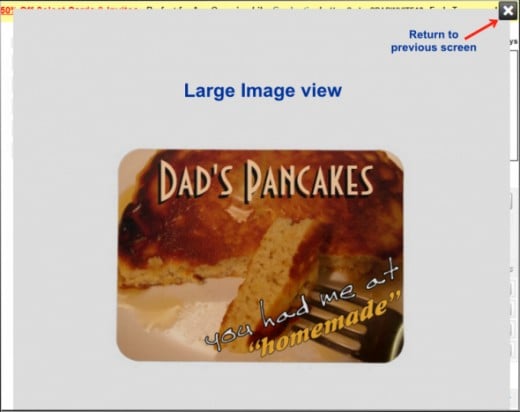
Zazzle's editing interface offers several options for viewing your progress as well as your finished work. You can toggle between Art View and Product View to see the how it will look on the finished product.
One of the most useful features is the Large Image View which is always available to get a good look at any product at any time. The large image view works for both the Art View and the Product View. Some large views may show a Zazzle watermark - this is to prevent someone making an illegal copy that could be reproduced without permission.
The Product View image above shows the end result of this customization tutorial.
Browse the Zazzle marketplace for fabulous custom artwork and oodles or personal gift ideas.
(Image By Author)

